
| Home | Go for the GT5 look using vertex and fragment shaders! |
|
|
|
Introduction
Racer cars can have a couple of lights defined. In-game you can press 'L' (although this is definable in data/controls/default.ini, search for 'key=l') to toggle the player's car lights on and off.
Two types of lights exist; 3D models and projected lights. The first ones are just models that are turned on or off based on the light state. The 2nd one is defined deeper in the rendering engine as a separate pass to add light to rendered objects in front of the car. It does so by projecting a texture in perspective while re-rendering the objects (lookup the internet on 'projected textures' for hardcore info).
Lights are defined in a car's car.ini file. Tracks can be defined as night tracks by setting special.ini's gfx.night to 1. In that case, all car lights will be on by default when loaded.
3D light models
Light models; braking lights (that are drawn when the player is braking) are specified in body.model_braking_l and body.model_braking_r, while body.model_light_l and body.model_light_r specifies front lights models.
Since v0.6.5, there is a small animation feature for lights, specifically meant for F1 flashing lights for example. The setting is in car.ini's animation.flash_lights. This setting specifies (in milliseconds) the duration of the 'on' state of the lights. The 'off' state is currently equally long.
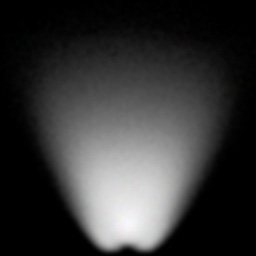
You specify projected lights in the car.ini's lights.light<n>.texture fields. See data/cars/default/car.ini for an example (which comments out the texture used). An example texture and screenshot follows below. Currently no positioning is possible yet (10-11-08), this should be added soon. Currently only 1 (front) projected light is supported.
Further options (definable per car since v0.6.5+):
| Parameter | Description |
| lights.light<n>.fov | The vertical field-of-view of the projected light. Start around 20, don't make it bigger than around 40. Value in degrees. |
| lights.light<n>.aspect | Aspect ratio; determines the horizontal field-of-view, relative to 'fov' above. Start around 5. |
| lights.light<n>.z | Distance to car nullpoint. This determines where the texture starts being drawn. Larger values push the light out further at the front of the car. |
| lights.light<n>.pitch | Pitching of the light bundle in degrees. Use around 3-7 for example. A high pitch means a lot of scenery is being drawn, which is potentially bad for the framerate. |
| lights.light<n>.far | Far plane of light frustum. Can be used to limit light's distance. The default 'far' value is the visibility (in racer.ini, fx.visibility). v0.7.2+ |
| lights.light<n>.color | (v0.8.24+) The light color, multiplied with the texture for the end results. The default is '40 40 40', which means 40 klux. |
Example light texture (note that this texture was vertically flipped at 20-1-2009 at the time of Racer v0.7.2; this is a more logical orientation for projected images):
Potential problems with projected lights
Projected lights redraw part of the scene, lightening the pixels. Although this doesn't take into account any real lighting effects (diffuse colors may look more washed out than they should), it is a cheap method. It is important to realize how the projection works:
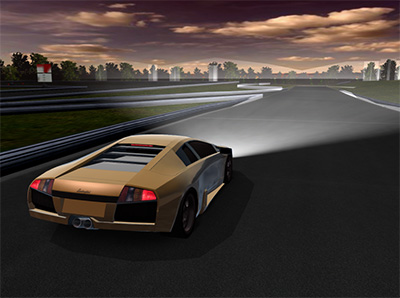
Example screenshot:
You can add flares to the car to intensify the lights. The flares light up when the viewing direction starts to match the direction of the flare. Racer v0.8.22 and on uses the klux lighting model so the coloring can now be much higher (instead of values between 0 and 1, you now uses a value between 0 and around 100).
Further options (definable per car since v0.6.5+):
| Parameter | Description |
| flares.flare<n>.normal | Normal vector (direction) of the flare. Relative to the car so "0 0 1" would be facing forward (a front light flare). For a rear light you will probably use "0 0 -1" (negative Z). |
| flares.flare<n>.pos | Position of flare center. I.e. "0 0 2" means 2 meter in front of the nullpoint, somewhere near the front lights. |
| flares.flare<n>.color | Color of the flare. I.e. "40 10 10" is a light red. The number are in klux (kilo-lux) for Racer v0.8.22+; around 40 seems okish. |
| flares.flare<n>.size_factor | Scales the size of the flare. The actually used size is a combination of factors; this size_factor scales the flare size directly. Also use intensity. |
| flares.flare<n>.hor_scale | Horizontal scaling of the flare. Normally 1, but you can increase (or decrease) this to get wider flares. |
| flares.flare<n>.intensity | Intensity (0..~5) of the flare. If the camera's distance to the flare becomes larger, the flare is enlarged to stay visible somewhat. However, the intensity limits the amount of enlargement. Defaulting to 1, a value of <1 makes the flare smaller (useful for rear lights). Front lights can use a big value around 2..5. |
| flares.flare<n>.z_offset | Polygon Z offset. Used to offset the depth of the polygon to avoid Z intersections (related to Z-fighting). If the flare cuts through the body, you can try a negative z_offset, something like -500..-2500. The more offset, the bigger the depth offset. The downside to a big offset is that the flare may start cutting into other cars (that are close by) or track geometry. The less z_offset, the less artifacts. |
| flares.flare<n>.rule | Type of light: 'brake' flares only light up when the car's brake is pressed. 'rear' flares only light up when the rear lights are on. Notice that rear lights can be made to flash using the car.ini's animation.flash_lights parameter. See above. |
| flares.flare<n>.billboard | Type of billboarding used; the default is 0, meaning screen aligned, and 1 means flare normal aligned. See below for examples. The screen aligned billboarding doesn't work nicely for wide flares, such as may be used for 3rd brake lights. All other square-ish flares are probably nicer with the screen aligned method. |
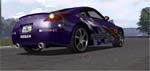
To understand billboarding better; there are multiple ways to do billboarding. For flares there are 2, screen aligned (billboard=0) and normal aligned (billboard=1). The first type looks like this (the alpha was removed here to clarify the billboarding):
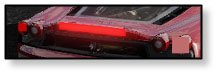
Notice how the regular brake lights are ok, but the 3rd (wide) brakelight doesn't cover the brakelight nicely. So use billboard=1 for that flare, and you get the better looking result (note the side brakelights still use billboard=0 here):
An example extract from a car.ini file:
flares
{
...
  flare3
  {
    pos=0.65 0.35 -1.7
    normal=-0.05 0 -0.5
    color=40 10 10
    size_factor=0.5
    billboard=1
  }
}
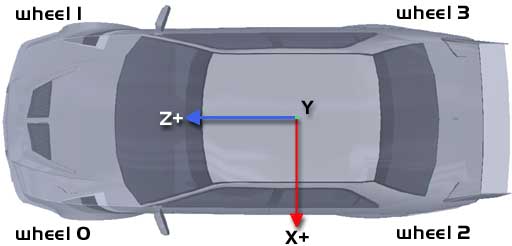
Remember the car's coordinate system to be able to define flare normals correctly:
(last updated November 13, 2012 )