
| Home | Stecki's Mini. |
|
|
|
Exporting DOF's From Zmodeler 12-20-01 - by Ryan Trevisol
This document is divided into two parts.
1- Prepping Meshes/Assigning Materials
2- Prepping Materials/Exporting
1- Prepping Meshes With Proper Materials
Let's assume that you have a mesh that's ready to go into Racer. Now, you want to begin the process of exporting it from Z-Modeler. The first thing you should know is that you do not have to fuse all your parts together. In fact, for normals sake, you should have quite a few parts detached. This does not in anyway impede Racer's performance.
Now, before you can export your model, you need to set up reflections, what parts of the car will be have environment mapping, and which will not. This does not actually require making a separate material in Z-Modeler. Read on to find out how.
Setting Reflections
Z-Modeler supports Chroming (aka reflections, env mapping) on the FACES level. Racer supports it at the MATERIAL level. So until now, designers thought they had to make two copies of most of their materials, one that would be chromed, and one that would not. You don't have to worry, Z-Modeler does this for you. Here's how. Before you start, go through and get rid of the copies of the materials that have no chroming. Now, make sure that all your faces are assigned to their proper materials, because if you went through and deleted a bunch of materials with the Material Editor, all those faces will be assigned to the default material. So, once you get them reassigned to the proper materials, close the material editor and go back to working with the model. All you should be left with at this point is copies of the materials that have environment mapping. Of course there's no difference between these materials, because there's no setting for reflections in Z-Modeler's materials. What you should do so as to see your changes, is to load a reflection map onto all your materials, so that when you start applying non-reflections, you can see the results.
Now, we're going to open up the "FCE Custom Faces" dialog, most of the settings in here are universal, so ignore the fact that those settings say they're for NFS. (alternately you could use the faces attributes dialog but that's harder to understand) Now, the first thing you need to do, is to show all your parts, select them all, go into SEL and MUL modes, choose faces mode, and click to select faces on all parts.
Select all the faces of your model, and in the FCE Faces dialog, make sure no flags are checked. If they are, clear them and hit apply.
Now, go through the model (you may want to do this one part at a time) and find the faces that should not have environment mapping. Select them, and choose "No Chrome" in the FCE Faces dialog, then hit apply. Once you have gone through the model and done that, you have successfully set your reflections for Racer. How? Upon export, Zmodeler will look at your materials, find any materials that have polys with both Chrome and No Chrome flags, and split them for export into racer. When you open the DOF in racer, or modeler, you will find that it has more materials than you had in Z-Modeler. That's because it has duplicates of materials that need to be partially chromed and partially not.
I'll give you an example. Let's say you have a model for a drum brake, and you want your lug bolts to be reflective, but the drum itself not to. We simply
1) Assign all faces to one material
2) Load a reflection map
3) Switch to faces mode
4) We select the faces that are not to be chromed
5) And check the box in the FCE Faces dialog that says no chrome.
Hit Apply See Image
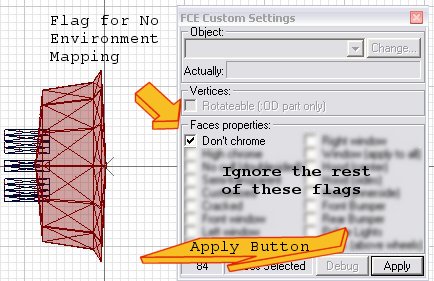
This file would end up being exported with two materials with identical settings except that one would have Environment Mapping Enabled, and one would not. This is really a simple way to do it once you get used to the idea. Those coming from NFS already are used to this idea and so it's very simple to them. :)
If that needs better explaining let me know. It's a feature I was totally unaware of until Oleg explained it so I don't think it was ever really explained.
Setting Transparency
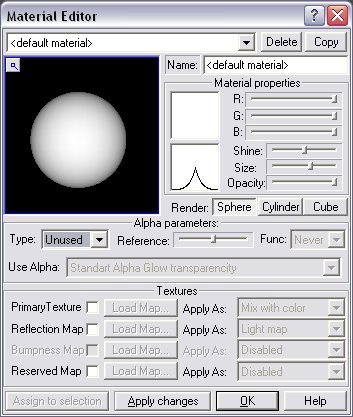
Well if you thought that the Semi-Transparent flag would be used in this case to do Transparent materials, you're wrong. There's no splitting of materials here, you have to have a transparent material. This is easily set in the Material editor. For materials without transparency, set the alpha Parameters to Type: Unused. For materials with transparency, set Alpha Parameters to Type: Glowing, and Use Alpha: Standard Alpha Glow with Transparencity (funny spelling). See these images.
 |
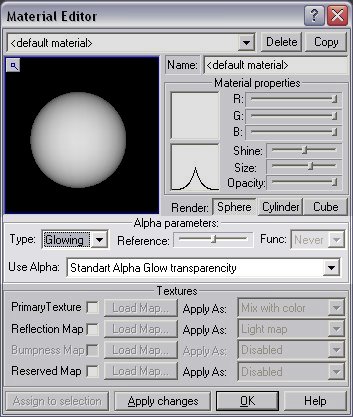 |
| No Transparency in this material. | Transparency Based on Alpha Channel |
So, now those materials are correctly assigned, let's talk about the materials themselves, and how you can make your cars look good in Racer.
2-Prepping Materials and Exporting
Material Settings are important and quite elusive. Fortunately a new DOF filter has been developed that has the capability to somewhat set your Ambient, Diffuse, Specular, and even Emissive colors. It also has the ability to set your Shine factor (the culprit for 9 out of 10 bad Zmodeler exports) I'm attaching this new filter for you to use that will do the things I'm about to explain.
Material Settings
When editing materials, you need to set one color value only, the diffuse color. For now, Z-Modeler will extrapolate the other colors from the value you enter.
Set the diffuse color by entering the Material Editor (E key) and dragging the sliders for Material Color to the desired value. From this, Z-Modeler will calculate the rest of the colors as follows. Ambient color=Diffuse Color * 0.5 Specular color= Always Bright White (for now this must be set in Modeler)
So if you entered a diffuse color at the center of each slider (128,128,128 in modeler) your Ambient color would be 64,64,64. Your Specular Color would be 255,255,255 as always.
Now, setting shine factor and emissive color are slightly complicated. Setting Shine factor is hard because it is opposite from Z-Modeler's native way of setting it. You set the Shine slider to the max for the minimum setting in Racer. So, for a shine factor of 128 in Modeler, you put the shine slider all the way to the right in Z-Modeler and export. Emissive color seems to be linked to the Size slider, though it is something you have to play with. See the image for more detail.
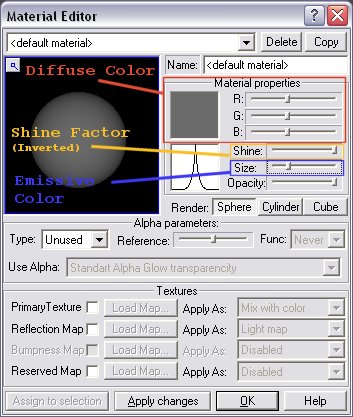
Also, don't fret if your model looks all dark in Z-Modeler, it's going to look fine in the game.
Exporting Your File
I'm working on getting Oleg to give us a dimensions readout in Z-Modeler but this will take some time. For now you will have to go by the positive and negative numbers in the readout and sorta eyeball it.
Some say you need to fuse all your parts together in order to export a DOF. That's not true. True, when importing a DOF, you have only one part that imports, but DOF itself supports different geobjects. Z-Modeler is rather smart when you export. It gives you a list of all the parts in your file and lets you decide which ones to export. If you have a Z3d that only has your body in it, then hit the little "All" button at the bottom and click OK. If you've got stuff you don't want in the DOF file, then hit all and deselect the parts you don't want. Then click ok. You're DOF will work just fine in Racer and Modeler. But, always keep a z3d of your model so that the separate parts are available to you. Yet another pic of what I mean.
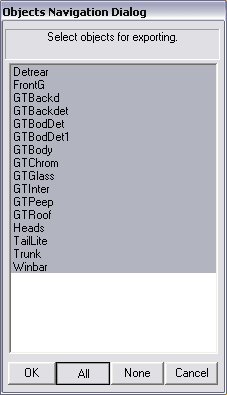
If any part of this document is unclear or incorrect (I hope not) please bring it to my attention.
Ryan T.
(last updated November 13, 2012 )