| Home | Adding dials to see RPM, gear, g-forces etc. |
|
|
|
VIEWS (GROUPS OF DIALS)
Views in Racer mean the different sets of measuring instruments (or dials) that your display shows. The km/h and rpm counter that you have seen are part of a single view. 3D incar views will make you want for more views. Normally, with outcar views, you'll have some displayed in 2D, when watching the car from the outside. In incar (cockpit) views, you can use a full 3D view, with which you can place dials and such onto the incar model (the dashboard) directly. Determining the XYZ locations of instruments is still a painful process though (by trial & error).
Views can be found in <cardir>/views.ini. Default elements are 2D (is3d=0). For 3D view elements, make sure 'is3d=1'. XYZ calculations are trial & error, if you don't have the model in a 3D modeler package like 3D Studio Max. Multiple views can be defined per car (views.view0.*, views.view1.* etc). These are:
Recommended is to start out with another car's views.ini file, and modify from there.
Many view elements will measure things, like velocity, or engine rpm. A full list of variables names follows (you can add these behind the 'var=...' lines):
| Variable | Description |
| abs_active | turns 1 if ABS is active (like brake_help_active) |
| ai_line_delta | Measure the distance between the current car lateral position and the AI line. Normalized to a value between -1 and 1. Note that if the AI lateral (u) position is 0.5 for example, the value will lie between -0.5 and 0.5; it is not normalized to the remaining space left and right, but uses 'u' in an absolute sense (although u is normalized itself). (v0.8.7+) |
| besttime | the best laptime so far in this session |
| brake_help_active | normally 0, turns to 1 if braking help is active. Braking help looks at AI speeds and brakes if the car velocity gets above that. This helps reduce speed for arcade gameplay. |
| brake_balance | Unused |
| braking | the amount of braking applied to the car (0..1) |
| clutch | the amount of clutch applied; note that this is NOT the controller input but rather the effective clutch, which may be different if you have the autoclutch assist turned on (0..1) |
| fuel | Amount of fuel in liters (0..maxFuel). |
| fuel_normalized | Amount of fuel (0..1). Based on maximum amount of fuel possible in the car. (v0.8.0+) |
| fuel_avg_consumption | Average consumption (over some time, around 1 second) in liters/100km. (v0.8.0+) |
| fuel_avg_lap | Average consumption for the current lap (v0.8.0+) |
| fuel_inst_consumption | Instantaneous fuel consumption. (v0.8.0+) |
| gear | current gear (0..9; 0=neutral, 1=reverse, 2=1st, 3=2nd etc) |
| gearbox_vel | rotational velocity of the gearbox |
| gforce_lat | lateral acceleration force |
| gforce_lon | longitudinal acceleration force |
| handbrakes | The current handbrake controller state (0..1) |
| highbeam | 1 if the highbeam lights of the car are on (not yet supported) |
| indicator_left | Turns to 1 when the left indicator control is on. |
| indicator_right | Turns to 1 when the right indicator control is on. |
| intermediate | last intermediate time (v0.5.4+) |
| lap | lap number |
| laptime | the current laptime |
| lights | 1 if the car lights are on, 0 otherwise. |
| mz | the force feedback at the steering wheel (in Nm). Since v0.5.3beta2.1. |
| odometer | the driven distance of this car in meters. |
| tc_active | turns 1 if TC (traction control) is active. |
| time_of_day | Time of day ingame (use with 'format=time_of_day' to get something like 12:34). (v0.8.2+) |
| raceposition | race position (1..50) (v0.5.4+) |
| rpm | engine rpm (rotations per minute) |
| rpm_warning | The car has a warning range for which the rpm is high enough that you should shift gears. This can be used in dashboards to indicate the amount of urgency. This value will originally stay within 0..1, so scale it up if you make a digital dial. This is easier when creating shift lights for example, since you don't have to deal with absolute rpm values, but rather this normalized version of the 'warning' range. These variables are named engine.min_warn_rpm and engine.max_warn_rpm. See also the engine description (in car.ini files). |
| rpm_warning_matrix | (v0.8.33+) Allows per gear, per led tweaking of the RPM warning. Only really useful for high-end racing teams, which need to tweak the rpm at which an rpm warning light trigger per gear and per led. |
| pacenote | main pacenote (0..11; 0=left5, 5=neutral, 11=right5; use as digital) |
| speed_limiter | Speed limiter enabled (0 or 1). v0.8.22+ |
| steering | Steering value (-1..1) |
| throttle | the amount of throttle applied to the car (0..1) |
| timediff_front | time difference between current car and the next car in front |
| timediff_rear | time difference between current car and the car behind |
| user<n> | Unused (n=1..8) |
| velocity | car velocity as measured through the transmission |
| velocity_wc | car velocity in world coordinates (so the actual car velocity, not related to the transmission) |
View elements
View elements are described in views.view<n>.elt<x>, where <x> is the element index. The element index must increase from 0, 1, 2 etc; if any element is missing the rest will NOT be loaded! All view elements support the following variables:
| Variable | Description |
| factor | Multiplier for the 'var' used. I.e. var=rpm and factor=2 means the value used is rpm*2 |
| factor_inv | If specified, this takes precedence over 'factor'; the factor is calculated as 1/factor_inv. This is just a convenient way to write numbers such as 1/5000, which you may encounter for example when defining LEDs for RPM shift indicators. |
| flash_duration | Time [ms] for the value to toggle between 0 and the real value. Useful for warning lights for example. |
| height | Height of element, based on a 800x600 windows. For example, if you use height=300, the element will be half the screen's height. |
| image | Set texture image. The image must have dimensions that are a power of 2 (for example: 128, 256, 512 etc) |
| invert | If 1, the value is inverted; that is 1/x. This is done AFTER 'factor' is applied. So the whole process is as follows: value=rawInputValue |
| is3d | If 1, this element will be drawn in 3D. |
| keep_aspect | If 1, it will keep the defined aspect (width/height) even if the resolution does not have an aspect of 4:3. For example, the resolution at which dials are defined is 800x600. Making a static dial image 100x100 pixels in size, then running Racer on a 1280x720 (=16:9) resolution, would normally scale the image more horizontally than vertically. This is needed for some dials that are next to eachother, to maintain placement distance. For some dials though, like RPM/velocity meter backgrounds, it's better to turn on keep_aspect, so that the circular look is maintained at any resolution. The default is 0. (v0.8.37+) |
| led_index | (v0.8.33+) If this is a led (warning light), this index is used into the rpm_warning_matrix to decide the exact rpm at which to trigger. Really only useful for high-end racing teams where a lot of detailed tweaking is required. |
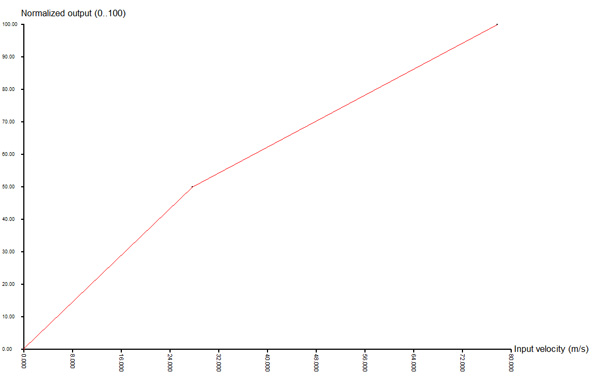
| map | (v0.8.22+) An optional input to output conversion curve. For example: map=map_velocity.crv. This .crv file (created with Curved) then maps raw incoming values in the curve's X axis to output values in the Y axis. For example, a lot of speed dials are really non-linear; they start out from 0-100 km/h, then proceed at half speed upto around 260 km/h. The input for speed is in meters/second. Normally, for a linear dial, you'd use min_value and max_value to go from 0 to 72.22 (260 km/h = 72.22 m/s). Now, you want a non-linear dial, so you map the input speed to a virtual value that indicates how far the dial should be. A nice range is 0..100 for example. The input (X axis) from the .crv then goes from 0..72.22, and the output goes from 0..100. You set min_value to 0, max_value to 0, and the curve then looks a bit like this:
You can see above that at around 27.8 m/s (=100 km/h), the dial output is already at 50. Given that min_value was 0 and max_value was 100, this means the dial will be halfway its entire range. After that, extra velocity means the dial will proceed slower. An example car that has such a dial is the Audi TT, or Audi A3. |
| min | Minimum value (after factor is applied) |
| max | Maximum value |
| min_angle | The minimum angle (rotation) in degrees. |
| max_angle | The maximum angle (rotation) in degrees. |
| min_offset | For linear elements, an offset to move the dial (in X if the view element has orientation=h, otherwise in Y). For example, if you have a dial that you would like to center around the (x,y,z) position, you could use min_offset=-50 and max_offset=50. This makes the image move across 100 pixels as it changes between min and max. Useful for horizontal dials for example. |
| max_offset | For linear elements, an offset to move the dial (in X if the view element has orientation=h, otherwise in Y) |
| min_value | The minimum value that 'var' may be, BEFORE factor (or factor_inv) is applied. |
| max_value | The maximum value that 'var' may be, BEFORE factor (or factor_inv) is applied. |
| orientation | Orientation of (linear) dial; horizontal ('h' or '0') or vertical ('v' or '1'). |
| pivot_x/pivot_y | The pivot point of the element (the point where it rotates around). Based on the element's local axis system, so 0 for both pivot_x and pivot_y means its default rotation point. |
| sample_hold | Time [ms] to keep the last recorded value. So the value is only being updated every x milliseconds. Useful for digital dashboards that only update their data every once in a while. (v0.8.0+) |
| type | Set element type; static is used for a simple graphical image: use 'image=...' to select a texture. Use type digital for a number (see below for more information on characters etc). Use type angular for rotating dials (rpm meters for example) or linear for a horizontally or vertically moving dial (see min_offset/max_offset and orientation accordingly). Type clip can be used in v0.8.36+ for a clipping image (actually it's currently stretching; this should be fixed). For a clip dial example, see below. |
| var | Variable that is connected to this element. See above (velocity, throttle, brake etc). |
| width | Width of element, based on a 800x600 window. For example, if you use width=400, the element will be half the screen's width. |
| x | X position |
| xa | X angle in degrees |
| y | Y position |
| z | Z position |
Digital view elements
Creating digital views is possible since Racer v0.5.2. This means you can create readouts for speed such as '123'. You must create an image that contains the characters 0123456789, a dot (.), a colon (:), a plus (+) and a minus (-) as the last character. Make this small font image fixed-width (every character should be the same width, also knows as non-proportional). Then define:
Example - an RPM shifting indicator
This example demonstrates a dial that will indicate to the player when he needs to shift gear. Every car (since v0.8.4) has an rpm warning range (see car.ini's min_warn_rpm and max_warn_rpm parameters). Using the rpm_warning variable, you can create a font image with for example 10 characters; the first being blank, then adding progressively higher warning colors (blue..yellow..red).
The example below defines 10 characters; the factor is set to 9 to make the maximum value '9', meaning the 10th character in the font image. Instead of using numerical characters, you'd just create rectangle filled with a specific color (and use full transparency for the first character probably).
Before copying & pasting, make sure you renumber the 'elt1' to whatever number is next in your views.ini file.
elt1
{
  var=rpm_warning
  type=digital
  x=160
  y=315
  ; Font
  image=rpmfont.tga
  src_char_wid=42
  src_char_hgt=42
  src_char_x0=0
  src_char_y0=0
  char_wid=20
  char_hgt=20
  ; Letter spacing
  char_dx=16
  format=simple
  digits=1
  factor=9
}
The above should give a nice digital rpm shift-light indicator. Often you will want to display separate LEDs that light up at a certain rpm. We still use rpm_warning, since that's normalized (0..1) so you can leave the exact rpm range to the car.ini file (engine.min_warn_rpm, engine.max_warn_rpm). The example below would use a font with an empty/unlit first character ('0') and a lit 2nd character ('1'). The factor specifies when the led lights up. Although the example uses 'factor', it's easier in this case to use 'factor_inv', since that exactly specifies the crossover point of 'rpm_warning').
elt1
{
  var=rpm_warning
  type=digital
  x=160
  y=315
  ; Font
  image=rpmfont.tga
  src_char_wid=42
  src_char_hgt=42
  src_char_x0=0
  src_char_y0=0
  char_wid=20
  char_hgt=20
  ; Letter spacing
  char_dx=16
  format=simple
  digits=1
  ; Keep end display value clamped from 0..1
  min=0
  max=1
  ; Input var (rpm_warning) should be scaled to get a '1' as the end value. Here, 10
  ; means an input value of 0.1 will give 0.1*10 = 1.0, so the 2nd character in the font is used
  ; (the font has 0123456789 etc).
  ; We could also specify factor_inv=0.1, which is the same as factor=10 (factor_inv=1/x)
  factor=10
}
The above gives a single led that turns on when rpm_warning>0.1.
Here is an example of a 'clip' type dial, which can be used from v0.8.36 on. This one shows damage as an increasing bar. You can change 'orientation=v' into 'orientation=h' for a horizontal bar.
elt0
{
   type=clip
   x=727
   y=70
   width=20
   height=78
   image=damage_fill.tga
   var=chassis_damage
   min_value=0
   max_value=1
   ; Orientation
   orientation=v
}
More tutorials
You can also visit these pages with tutorials from other people:
(last updated November 13, 2012 )