
| Home | Add moving suspension graphics to your vehicle! |
|
|
|
Introduction
Racer has the possibility of so-called generic models (v0.8.7 has a maximum of 50 models). What this means is you can add a couple of graphics models to your car that are not explicitly defined (like the wheel and brake models for example). This allows you to add moving springs, moving suspension arms, dampers and other objects (like separate wings or such, or perhaps windscreen wipers which some day will get supported endpoints for animation). The models can have dynamic endpoints, and the object is fit inbetween them (springs), or directed through them (damper shafts).
Generic models have been broken for many versions since the introduction of the scene graph. However, v0.8.5 fixed this; it also improved on the matrix generation; the older versions used to generate shearing matrices. Also, a few new options were introduced.
Note that this is a relatively complex subject; hopefully a multitude of images will make clear how Racer implements these flexible moving parts. The idea behind is that you model a car part as a separate model, and then place it somewhere relatively to the vehicle, possibly stretching it to fit between 2 endpoints. Also, look at existing cars such as the Baja and Boomer's IMP-GS car.
Generic models are useful for simulating motorbike parts for example, and they should be able to simulate linkages for open-wheel cars.
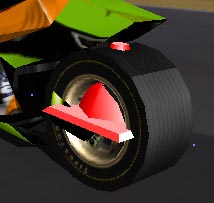
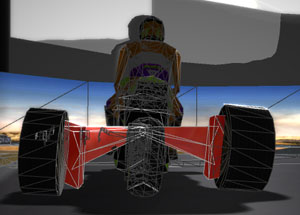
Below is an image produced during development, using a cone for a spring. While driving, the cone neatly compresses itself inbetween the wheel and suspension attachment location, scaling and rotating as needed (an animation would ofcourse clarify things much better).
Car parts appropriate for generic models
So generic models are normally used as moving parts, fitted inbetween 2 endpoints. What kind of parts can you think about? Well, there's quite a lot:
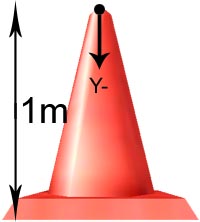
The model can (but does not have to) be normalized; this means that they are exactly 1 meter high. This enables the simulator to scale the object more easily so it fits between 2 points. Also, they orient themselves along the Y (up/down) axis, with the model starting at (0,0,0) and located on the negative Y side (below the origin). So if you have a cone like in the above example, the tip of the cone is at (0,0,0) and the cone extends downwards.
Next is to include the model. For that you need to add it to the car.ini's graphics section.
There are 2 types of generic models; static ones (which are not moved) and dynamic ones (stretches between their from and to points). First an example of a static model:
graphics
{
  ; Generic models
  generic
  {
    model0
    {
      file=big_wing.dof
    }
  }
}
The above model will appear just on its originally modeled position, relative to the chassis. The 2nd type (from/to) is more interesting. Here's an example of a swingarm:
graphics
{
  ; Generic models
  generic
  {
    model0
    {
      file=dev_spring.dof
      from=0 0.3 0
      ;from=susppos2
      from_offset=-0.75 0 0
      to=wheelpos2
      ; Bring to centerline
      to_offset=-0.75 0 0
      fit=0
      scale=1.0
    }
  }
}
If you use the 'from=susppos2' line instead of 'from=0 0.3 0' (the latter fixes the from location to a relative Y=0.3 point), this model will behave like the spring as shown in the image on top of this page, connecting the suspension attachment position with the wheel position. The from_offset/to_offset then allows some movement of these connecting spots so you can adjust things a little. Supported from/to syntax:
Visually checking the properties
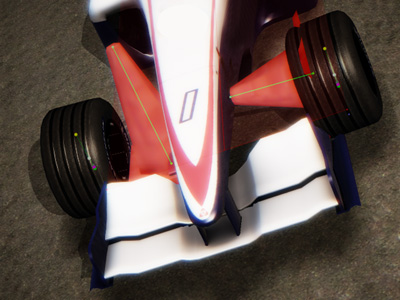
It can be challenging to match the model's position correctly. To assist, you can turn on the car points development option ('show carpoints' script command or set racer.ini's gfx.show_car_points to 1). Below shows an example; the 'from' and 'to' points are shown ('from' is indicated with a small green dot, 'to' is indicated with a small red dot (since v0.8.36)), including the offsets and any realtime movement. Note that the colored dots are from the suspension (indicating bumpstops, current length etc).
Different generic models require different properties. Consider a spring - you want the model to compress. Take a damper shaft - that is a rigid body and will only point in the right direction, but won't compress. A damper would consist of 2 models - the incoming shaft and the housing. A few properties are available to determine the behavior of the model:
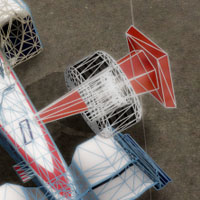
To demonstrate how these work, consider the images below. They use a cone (sized 1 meter high) to make the generic model more clearly visible. Also, the attachment point is at the car side, pointing outwards to the wheel, a bit above the center. A real model would be the upper arm of the suspesion.
The first uses fit=0 and scale=1 (the defaults). Note how the model sticks out - it is still 1 meter long. It will move with the wheel though, from the static attachment point on the chassis to the point on the wheel (dynamic) where its endpoint is.
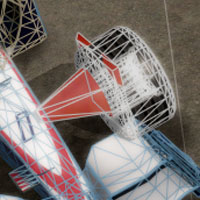
The next image uses fit=1. This will fit the object (assuming the 3D model is sized at 1 meter in the Y direction) between the from and to points. Note how it is resized exactly to fit inbetween the points, by scaling the 3D model. This is done along the 3D model's main (Y) axis only!
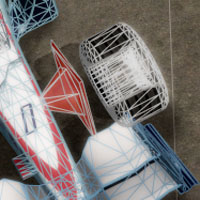
Then, how about an extra scale on top of this. This may be useful for some models to finetune the fitting process. Setting scale to 0.5 instead of 1 gives this (fit is still 1).
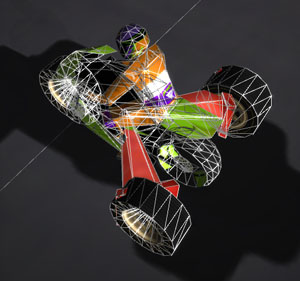
During testing, I created a small quad/trike style vehicle with generic models (the bike itself handles horribly bad, so it's not interesting to drive in itself). The first image shows 2 linkages going to the outside wheels; the 2nd shows the leaning effect in action. The car.ini settings used:
graphics
{
...
  ; Generic models
  generic
  {
    model0
    {
      file=dev_spring.dof
      from=0 0.3 0
      to=wheelpos2
    }
    model1
    {
      file=dev_spring.dof
      from=0 0.3 0
      to=wheelpos3
    }
  }
}
Below is the first image, showing the result of the above generic models (wireframe mode on to clarify):
The next image shows the independent models in action during a turn.
Racer v0.8.5 came with an extra car that demonstrates moving suspensions. Check out its car.ini to find a bunch of models implementing springs, dampers, arms etc. The front has 10 generic models per side (damper top 2x, damper bottom 2x, spring 2x, upper arm, lower arm, steering rod and steering axle). The rear has 7 (2x damper top, 2x damper bottom, 2 springs and 1 solid axle).
Note that this is all visual; the internal physics still use independent suspensions.
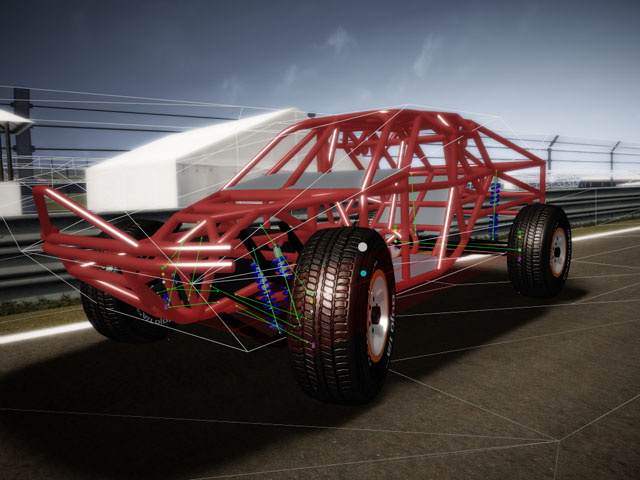
The image below shows the Baja, with physics wireframe on ('wireframephys on' script command) and car points on ('show carpoints') to display some geometry.
The 3D models making up the suspension are freely available. The format is Max2009. Download them here (94Kb zip). Notice the orientation and origin of the models.
(last updated November 13, 2012 )