
| Home | Non-linear damping can make the car smoother.. |
|
|
|
Introduction
This page describes everything on how to define suspensions for your car. There are multiple aspects concerning suspensions:
A document describing all car features can be found here.
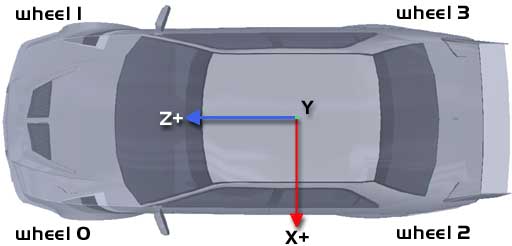
Suspension location is specified in susp<n>.x/y/z (in meters) . This is the attachment point of the spring relative to the car's nullpoint (not necessarily the same as the CG!). Customary (though not required this standard is useful) is to use the follow order (for 4-wheel vehicles):
The next 3 parameters are restlen, minlen and maxlen, which indicate lengths relative to the suspension attachment point (susp<n>.x/y/z, which is relative to the nullpoint again).
'restlen' gives the length of the spring when in rest (no spring force). Don't mistake this for the rest state of the car; restlen really indicates how long the spring would be if you would have it lying on a table before, without anything attached.
The 'minlen' and 'maxlen' parameters state the absolute minimum and maximum length of the spring. So for example, if restlen=0.9, minlen=0.3, maxlen=0.7, you have a spring that would be 0.9 m long but is preloaded (pre-compressed) 0.2m and can vary (0.7-0.3)=0.4m in length. Bumpstops and reboundstops are used to keep the wheel in place (inside minlen/maxlen).
'warplen' was introduced in v0.8.9 to give the length of the spring when warping (the car is put on the track). To calculate a nice value, set it to 0, put the car on a flat piece of track, check the suspension lengths with Ctrl-8 and put those numbers in 'warplen' for the front/rear suspension. 0 is the default, which attempts to calculate a reasonable number (probably the average of minlen and maxlen).
Racer version before v0.8.1 restricted restlen to at most maxlen, but this has been corrected since it's not realistic; in real life, just about all car springs are precompressed.
One the spring gets close to minlen/maxlen, older versions of Racer would limit the spring length to that and cut wheel vertical velocity. Later versions (around v0.8.2) don't add this software limiter, but use reboundstops and bumpstops to keep the wheel inbetween minLen/maxLen. This is more physically logical.
In susp<n>.k you specify the spring's rate (in N/m). Actually, this is the wheel rate, which is different from the actual spring rate (which is not used in Racer). In a real car, you have an installation ratio, which specifies the scaling of the spring effect. For example, if you spring attached halfway along the arm to your wheel, your installation ratio would be 2:1. This modifies the effective rate (which is called the wheelrate) which you feel at the wheel connection. An example value is 20000, although sports cars may use higher values into 50000 or more. High-downforce F1 cars use even more; using implicit wheel physics becomes critical with these types of cars to avoid instabilities and subtly shaking wheel (numerically).
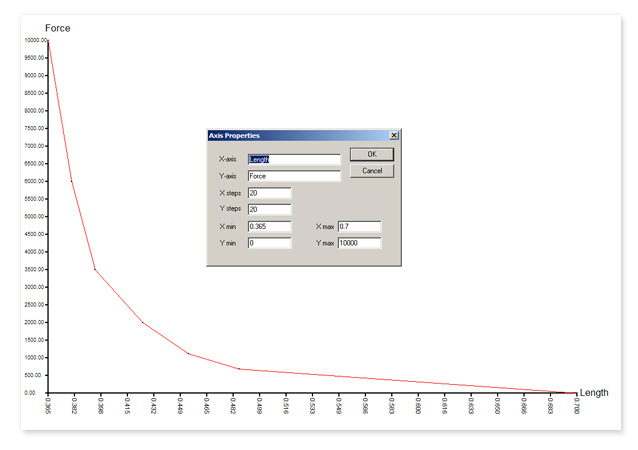
Another way to define springrate from v0.6.3 on is to use a drawn curve (can be created in Curved). This can be used to create progressive springs for example. Use susp<n>.k_curve to state a .crv file (in the car directory) which is used for the spring force vs spring length (this is true at least for v0.8.3; earlier versions may have used 'spring force vs deflection (distance from rest length)' ). Normally you'll probably just want to use linear springs though, and add bumpstops as the 2nd spring for the end of the spring (and possibily rebound stops).
An example non-linear spring curve is shown below (named k_front.crv for example):
Bumpstops are an extra spring in the suspension system that deal with the highest compression area. They are available since v0.6.3.
To add bumpstops, you add 2 variables to your car.ini's susp<n> sections:
The bumpstop is a non-linear spring, meaning its spring rate increases with compression. So the force itself will increase exponentially. The bumpstop will kick in when spring length = min_len+bumpstop_len. At that point the force is just 0. Once the spring length reaches min_len it uses its full rate (bumpstop_k). Currently the bumpstop spring rate is linearly calculated from its compression.
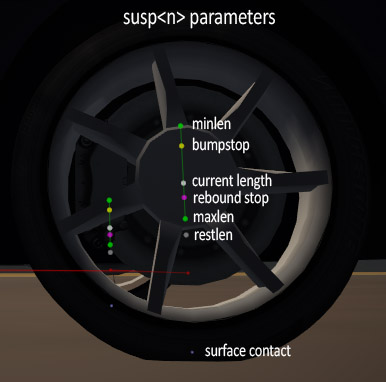
Check the image below: the green line indicates minlen to maxlen, with the yellow dot indicating the start of the bumpstop and the whitish (it's a bit gray here due to HDR rendering) point the current suspension length. The reboundstop is available since v0.8.1.
Testing the bumpstop
When designing the car's physics, set gfx.show_car_points to 1 (in racer.ini). It will show the suspension attachment point, plus the suspension line and also the bumpstop start as a yellow dot. You can also just run the game, then run the console command 'show carpoints' (and 'hide carpoints' to hide them again).
Reboundstops are the opposite of bumpstops; they prevent the wheel from leaving the car's suspension at the bottom side. They are available since v0.8.1, but are quite important for in-flight situations.
To add reboundstops, you add 2 variables to your car.ini's susp<n> sections:
The reboundstop is a non-linear spring, meaning its spring rate increases with compression. So the force itself will increase exponentially. The stop will kick in when spring length = max_len-reboundstop_len. At that point the force is just 0. Once the spring length reaches max_len it uses its full rate (reboundstop_k). Currently the reboundstop spring rate is linearly calculated from its compression.
See the picture above at the 'bumpstops' section for an image that explains all suspension points.
If you only had a spring in your suspension, the car would wobble up & down almost infinitely. That's why you have dampers to damp out the oscillatory motion of the tire.
There are 2 fundamental ways of defining the damper; mathematically or with a drawn curve (using Curved). The manually drawn curve is actually often better than the older method, so this is explained first. The one variable that you need in that case is:
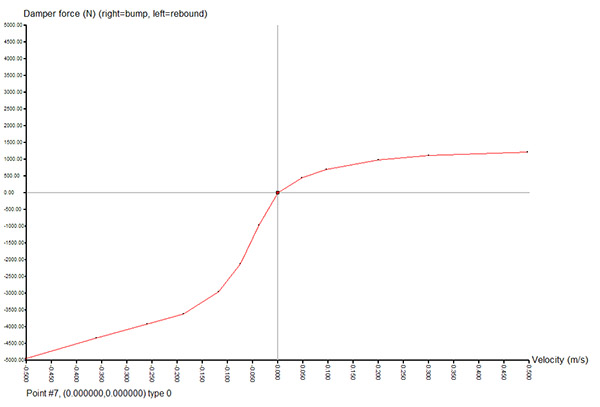
An example damper curve as seen in Curved (this would be for a sportscar) is displayed below. Also check out this article for 2 real-life graphs.
The alternative method to defining dampers is mathematically. There are 3variables that deal with this method (note that you can replace 'bump_' with 'rebound_' for each variable). Bump and rebound characteristics can be set independently.
Note that the damper rate is given from the wheel's perspective, just like the spring rate is given as the wheel rate. So take care when you see a car's damper specifications; normally you want to adjust for the motion ratio (that specifies how far the damper is away from the wheel; a value from 0 to 1, where 1 means the damper is on the wheel itself, and 0 wouldn't really make sense, but a value like 0.7 may not be uncommon).
| Function | Example graph | Description |
| linear/0 | 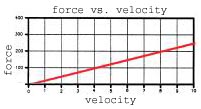 |
The default method uses linear damping. F_damp=bump_rate*v (where 'v' is the wheel vertical velocity). Recommend for the rebound side. |
| exponential/1 | 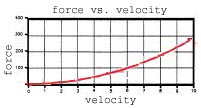 |
Exponential. F_damp=bump_rate*v^2. Not recommended to use. |
| digressive/2 | 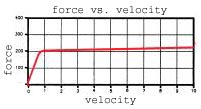 |
Topping off at some value. F_damp=max(bump_rate*v,bump_max). Actually, the graph here is a little confusing perhaps since that still rises after the bend. In Racer, it stays flat at the maximum force. Use a damper_curve if you need more control. |
| sqrt/3 | 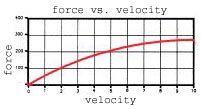 |
Gradually decreasing damper stiffness. F_damp=bump_rate*sqrt(v). Recommend for the bump side. Note that in real life, although dampers may exhibit a bit of the square root shape, actually the initial envelope is much stiffer. So 'sqrt' underestimates the damper forces at low (piston) speed, which is really where most of the action is happening. Using a drawn curve that is much sharper at low velocities is much recommended for more stable cars. |
Practical notes on dampers: for start values of dampers, it's important to look at the spring (wheel) rates. Racing cars normally have about twice the damping rates of passenger cars. Also, the bump side can do with some roll-off of the damper stiffness, so use the 'sqrt' function. Use 'linear' for the rebound side (function 0) as a start. Also, keep the bump rates about twice as small as the rebound rates.
Every suspension has a roll center, which is the point
where if you apply a lateral force, the body will not roll. Although these roll
centers are really dynamic, they're static for now in Racer (v0.5). They were
static in Grand Prix Legends btw.
Roll centers are very important, but hard to figure out. The larger the distance
(vertically) from the center of gravity, the more roll the body gets when turning.
This can be alleviated somewhat using anti-roll bars.
| To the right you can see a typical example of roll centers in action. The height difference of the RC to CG is the arm at which roll torques are applied; the further away from the CG, the more roll. Notice that if you would raise the RC to above CG level, the roll effect would be reversed (giving a motor bike effect, leaning into the corner). This is indeed physically possible, but not a desired effect. So keep CG.y > RC.y. Also notice there are only 2 RC's painted here; they are generally the same for both wheels at an end of the car. However, as the RC is purely a matter of suspension geometry, there is no practical reason why for example the front left and front right wheel don't have different RC's. |
 |
Note that only susp<n>.roll_center.y is really used to determine chassis forces. The Z coordinate is ignored (will be the same as the suspension.z). The X coordinate is used only in roll jacking forces, in case the roll center is offset laterally. Normally though, roll_center.x is 0.
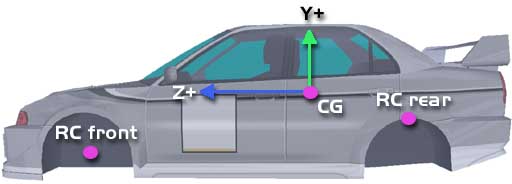
For general cars, mostly the roll center at the front is lower (for wheel0/1), and the rear one is higher (near or even higher than the center of gravity). Note that really the 2 front wheel have just 1 rollcenter, but you must specify them separately for Racer since you are allowed to do 3-wheeled vehicles.
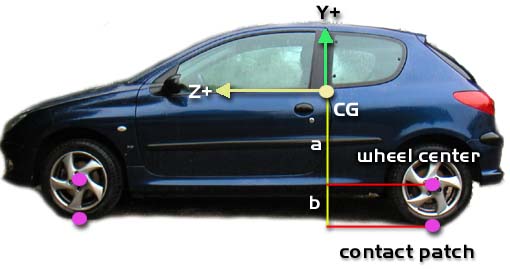
v0.5 beta 2.2 introduced anti-pitch variables. These are just for now (as a more elaborate suspension system is designed) to get better suspension simulation. Just like roll centers influences roll moments (see above), the suspension geometry also influences pitching moments. In analysis these are called anti-pitch parameters. It changes the arm from CG height to contact patch height that you would normally use to calculate pitching when the car brakes or accelerates. In other words; depending on the suspension geometry you can reduce the pitching moment, so the car pitches less than it normally would. Note that this does NOT mean that total longitudinal transfer changes; that is the same as usual. It's just that the car pitches less.
There are 4 anti-pitch parameters that play a role (table produced with help from John C. Dixon's "Tires, Suspension and Handling"):
| Parameter | Direction | End | Lower arm point with inboard brakes | Lower arm point with outboard brakes |
| anti-dive | braking | front | wheel center | contact patch |
| anti-rise | braking | rear | wheel center | contact patch |
| anti-lift | driving | front | wheel center | wheel center |
| anti-squat | driving | rear | wheel center | wheel center |
As the arm is varied according to the situation, you only need to specify a single anti-pitch parameter. That is in susp<n>.anti_pitch. This can range from 0..1, where 1 means full anti-pitch (no pitching moment, car stays straight) and 0 means no anti-pitch whatsoever (full pitching moment).
| To explain how anti-pitch works physically, see the picture on the right. A longitudinal force is generated at the contact patch. If you're accelerating, a pitching torque is generated around the car's CG with the arm 'a', modified by anti-lift/anti-squat (the formula then becomes (1-antilift)*a for example). When you're braking, it depends on whether you have outboard or inboard brakes. With inboard brakes, only the arm 'a' is used. With outboard brakes, the full arm a+b is used. |
 |
Inboard brakes finally are specified in wheel<x>.inboard_brakes. They default to 0, meaning the wheel has outboard brakes.
Suspension - geometric effects
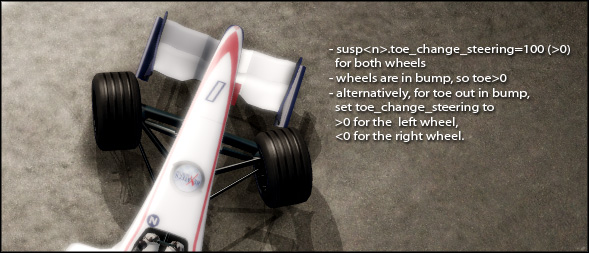
As the suspension moves, several relatively subtle things are affected. Since v0.5.2 beta 7.5, these are available:
Anti-rollbars are specified separately from the suspensions (as they influence 2 suspensions per bar). The bar works as a spring between the difference between the left and right suspension deflections. So if one suspension goes down, it tries to pull the other side down as well (and vice versa).
Mathematically, the anti-roll bar force is expressed as: force=(compression_right-compression_left)*k (force in Newtons, compression in meters, k in N/m).
(last updated October 27, 2013 )