
| Home | A John Player Special Lotus from 1970 in one of the oldest versions of Racer. |
|
|
|
Introduction to car creation
Racer is designed to allow you to create new cars relatively easy (especially compared to racing simulations such as rFactor). Cars are stored in the installation's data/cars directory, under their own directory (i.e. 'data/cars/porsche911'). Don't use spaces in the car directory (actually Racer will automatically detect and rename such directories!). Also it is advisable to use lowercase characters only to provide easier compatibility with non-Windows operating systems such as Linux (Mac OS X is actually case-independent).
A car's physical and graphical appearance is mostly defined through its car.ini file, which is stored in the car directory (data/cars/porsche911/car.ini for example). This file contains the physical details, such as suspension settings, CG (center of gravity) location, graphics models, tire parameters etc. For a reference to all car variables (in the car.ini file in data/cars/<yourcar>), go here.
Starting out
Before jumping in, it is wise to at read the general instructions on (content) development for Racer. That article describes tools that will help you troubleshooting the problems that come up during the creation of a new car. After knowing what's available to you as a car and/or track developer, come back here.
There are a LOT of details available to you when you start a new car. Therefore, it is advisable to start out with a car that looks and/or feels similarly to the car that you want to create. This avoids having to start all the way from scratch. To make the basis for your new car:
Areas of expertise - graphics and physics
There are 2 things when it comes to creating a new car; 3D models and physics. Most people will find either of these 2 the most interesting. 'Tuners' (people who are more inclined to tweak the physics) can be contacted at the forum. Perhaps it is even best to split this job apart in these 2 disciplines.
Which car to model
Lots of cars are already available, but Racer seems a bit like Lego; many people want to create their own models. It's part of the fun of Racer. For inspiration, visit Sports Cars.org for some nice cars you might to model.
Graphics - obtaining car specifications
A lot of information on a lot of cars is available on the web. You may check the links page for a lot of Internet links. Also some relevants sites are listed here:
For Grand Prix Legends F1 (1967) cars, there is a lot of technical info at these places:
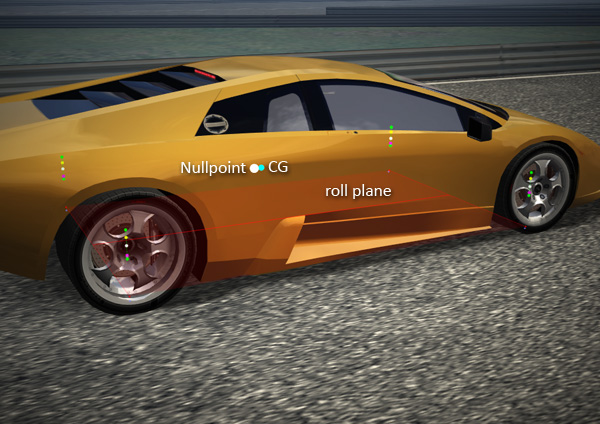
The car's reference point - the nullpoint
Cars have a design reference point, which is called the 'nullpoint'. It normally is nearly the same as where you'd put the CG. But as the CG may be tweaked a bit (fuel changes for example, or driver movements), you need a static reference point from which all other points in the car are defined.
For more information on the nullpoint, see the tutorial about the nullpoint.
Creating the 3D models
To create the models, you'll need a modeler. I recommend 3D Studio Max and export using .ASE files. The ASE importer is one of the most used formats for me personally (so it also probably does best at importing all of the available data). Other than Max, you can also use Maya or SoftImage or whatever you feel like. If you want to use a free modeler I'd recommend ZModeler or Blender, which has a DOF import/export filter so you can work very directly.
ZModeler tutorials:
More information on usable modelers can be found in the modeling tutorial.
Also note that v0.9 of Racer has a Cg and a non-Cg version. You can support older cards by providing a car_nocg.shd file, which is loaded when you run 'racer_nocg.exe' instead of racer.exe. More information on doing without Cg here. Information on Cg/GPU shading here.
Check out the tutorial on car collisions for detailed information.
Things to know
Creating car cameras
See the tutorial on car cameras for more information.
The Steering Wheel
You can add a 3D model to your car by adding a 'model' section in the 'steer' section (in car.ini). A bit of hassle is to get the XYZ parameters right; just use your car cameras well to figure out a nice location for the steering wheel. If no model is specified, no steering wheel will be displayed.
Check out this page for all the information about creating sets of dials for the car.
Creating the physics
The physics of the car is an art in itself, just like setting up real cars. The best place to start is the car.ini reference guide, which contains explanations & tutorial links for all the available settings that make up a car (and it's a lot!).
Spicing the car up
Optionally, why not make your car even better:
Debuggin the car
Racer helps the content creator to verify what the car is doing. Taking care of the following points helps:
Tips
Links for physics info
For useful technical information about your new car, you may want to check out these links.
Releasing your car to the public
When you're ready to display your car to the public, take some notes on how to do the release. See the Release Document.
First and foremost is to run your car and then check QLOG.txt for errors & warnings. A lot of cars still generate many warnings which are unnecessary. There is a page on fixing common warnings.
(last updated November 13, 2012 )